How to use the Evidence Evaluator
Last updated: October 28, 2026
Overview
The Evidence Evaluator reviews files you upload to a document test and tells you whether it meets that test's requirements. Instead of waiting for a Mycroft employee to review or finding out later during an audit, you get feedback right away.
If the evidence falls short we explains why and what's missing, so you can make the correction and swap in a new file before moving on to the next item.
When to Use
The check runs automatically every time you add evidence to a document test. You don't need to turn it on. It's most useful when:
You're not sure whether a file satisfies what the test is asking for.
You're uploading evidence to a test for the first time.
You've added several files and want to confirm that together they cover the requirement.
How It Works
Open a document test and go to the Evidence tab.
Add evidence using File upload, Add URL, or Document editor.
After the artifact is added, you'll briefly see an Analyzing state, then the Evidence Evaluator result appears.
The check re-runs every time you add or remove evidence on the test.
The check looks at all evidence on the test together, not each file on its own. If one file covers half of the requirement and another covers the rest, the test is judged on the combined set.
Reading the Result
Each result includes a verdict and an explanation.
Verdict
Relevant: The evidence on this test meets the requirement.
Needs more evidence: The evidence is related but incomplete. For example, a screenshot of team roles may support an access control test but isn't enough without the role-based access matrix itself.
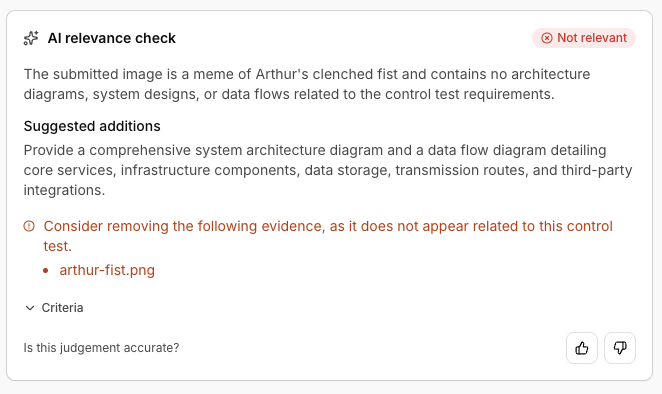
Not relevant: The evidence doesn't address what the test is asking for.
Explanation
The explanation describes what the evidence contains and how it compares to the requirement. For example, if a Slack screenshot is uploaded to a test about segregation of users and systems, the check will say the screenshot shows chat and meeting settings and contains nothing about logical separation between users or systems.
When evidence falls short, a Suggested additions section lists what to add or change to meet the requirement.
Open the Criteria dropdown to see what the check is looking for on this test. Use it as a guide for what to upload next.
If some files on the test don't seem to belong, the check lists them by name so you can remove them.
What to Do Next
Relevant: No action needed. Publish the document when you're ready.
Needs more evidence: Check the suggested additions and criteria for what's missing, then add another artifact that fills the gap.
Not relevant: Delete the artifact (click the artifact's dropdown menu, then Delete) and upload the correct evidence.
The Evidence Evaluator is guidance only. It never blocks you from publishing a document. If you believe your evidence is correct, you can still publish, and your Mycroft team can review it with you.
Giving Feedback
Under each result you'll see Is this judgement accurate?
Select Accurate (thumbs up) or Inaccurate (thumbs down).
If you select Inaccurate, you can add context on what made the judgement inaccurate. It's optional, but specific details about why the evidence does or doesn't satisfy the test help the most.
Submit your feedback.
Your feedback is used to improve the check over time.
Tips
Use clear titles and descriptions on your artifacts. This helps both the check and your auditor understand what each file shows.
Keep only what's needed. Extra unrelated files won't cause a passing test to fail, but they add noise for your auditor.
If the criteria don't match how your organization meets the control, mark the result as Inaccurate, explain why, and reach out to your Mycroft team.